Here we go over how to restore and repair a very worn leather sofa made of dyed/pigmented leather, and make it look like new.
We will show you how to repair a leather sofa by filling in scratches and cracks with leather filler. We then dye the leather with leather dye, restoring the leather sofa to near-new condition. The restoration in the guide is done on top-dyed leather, or as it is also called, pigmented leather. It is a type of leather where the leather color and leather finish are on top of the leather's surface. The leather is not dyed through. This type of leather is very common on furniture and car upholstery. If you are unsure of what type of leather your furniture has, you can read more about different leather types in our guide that you can find here.
We will now restore and repair the leather on the worn leather sofa below, to show you step-by-step how to proceed. Of course, you can also use the guide as a guide when restoring leather & hides on other types of leather furniture, or on leather car upholstery, as well as all other products made of dyed/pigmented leather. Here, however, we focus on repairing the leather sofa below. Stay tuned!

Step 1 – Cleaning and preparing the leather
The first and most important thing to do is to clean and prepare the leather before dyeing. In addition to everyday dirt from skin and clothing and the surrounding air, the leather sofa may have been treated with various leather care products over the years; leather balm, leather oils, waxes containing silicone and other things that have both settled on top of the leather's surface and penetrated the leather's pores and filled them up. If this is not removed from the leather's surface, the dye will have difficulty penetrating and adhering properly. It is therefore very important that the leather's surface is cleaned and prepared properly.
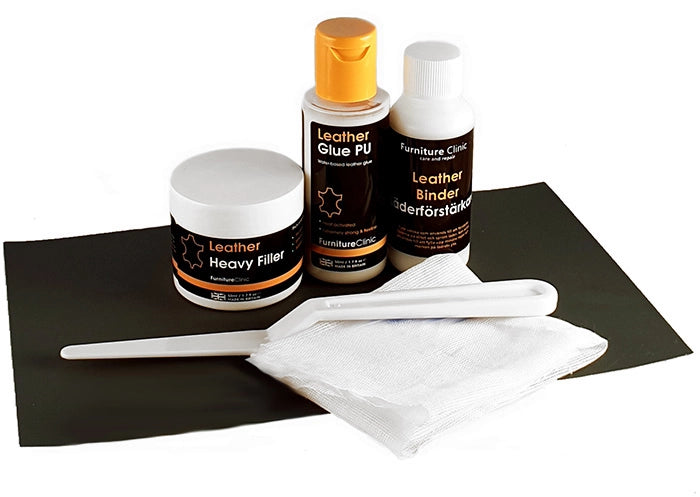
During the preparation process, we also remove the original surface finish of the leather. For this purpose, we use Leather Prep. In the pictures above you can see that the surface finish of the leather has cracks and crazing, a large part of these will disappear when the leather is "prepped". The leather is very worn and cracked so we will also use Leather Binder, Heavy Filler Leather Filler and Leather Colourant when we carry out the restoration. If the leather has no cracks, or only a few, then you do not need to use Heavy Filler Leather Filler.
Always start with the back and sides. It is common for this to be a different type of leather, a split leather with a polyurethane surface (plastic) applied, or even artificial leather (which is made entirely of vinyl/plastic). These surfaces are more delicate and you should not use Leather Prep here, as it can damage the surface. It is enough to first clean with the leather cleaner Ultra Clean and then wipe with a cloth dampened with Alcohol Cleaner. Not using Leather Prep on the sides and back will not affect the end result, as these areas are not actually used and therefore not “stressed”.
However, since seat cushions, back and armrests are used in a different way, are worn and exposed to stress, it is important that the leather on these surfaces is properly prepared. For this purpose, we normally use a scotchbrite (square, green sanding cloth) and Leather Prep. to sand away the old surface finish and smooth out cracks and scratches. The leather is sufficiently “prepped” when the sanding cloth or rag you are using begins to become stained by the color of the leather. This means that the surface finish has been removed and the colored surface underneath is exposed.
But since the leather on the sofa in this case is so worn (the paint/finish is already worn away), we are content to wipe the leather thoroughly with Leather Prep on a cloth. This way we avoid damaging the leather further.
Through the above procedure we have removed the manufacturer's original surface finish, as well as all silicone that is solvent-based. However, there is silicone that is not solvent-based and we need to remove these as well. For this we use Alcohol Cleaner/Silcone Remover. After the "prep", you therefore wipe the leather with a cloth moistened with Alcohol Cleaner/Silicone Remover. This also dissolves grease, so with Alcohol Cleaner/Silicone Remover the surface of the leather is degreased. Then wait for 30 minutes while the prep and alcohol evaporate.
Step 2 – Repair cracks and worn areas on the leather

The pictures above show the poor condition of the leather on the seat cushions. The close-up above shows how more than twenty years of wear without treatment has resulted in cracks in the surface layer of the sofa cushions as a result of the leather becoming dry and brittle. If the leather had been cared for regularly with, for example, Leather Protection Cream, this could have been avoided.
We will now reinforce the worn areas and fill in the scratches. First we apply Leather Binder with a sponge. Leather Binder is a binder that pulls together and strengthens the leather fibers. It will also prevent the leather from cracking again in the future. Apply 3-5 coats of Leather Binder, letting it dry between each coat. In addition to Leather Binder penetrating and strengthening the leather, it builds up a surface layer on top of the leather and strengthens it. NOTE, Leather Binder can accumulate around and on the seams, remember to remove excess before the binder dries.

The leather will change appearance as the Binder is applied. In the case above, it looks as if the Binder has dyed the cracks. What has happened is that the leather has darkened as it has absorbed the binder. However, we are not done with the cracks yet. Now we will fill them with Heavy Filler leather filler.
Step 3 – Fill cracks in the leather with Heavy Filler Leather Filler
After we have applied Leather Binder to reinforce the worn leather and prevent it from cracking again in the future, it is now time to repair the leather sofa by filling the existing cracks with Heavy Filler leather filler. Heavy Filler is not suitable for filling larger holes or burn marks, for this there are other methods (see below the post " Instructional videos" , and e.g. in “Guide to repairing burn holes” ).
To fill the cracks with Heavy Filler leather putty, use a putty knife or palette knife . Be careful to remove any excess putty that has ended up outside the cracks. When all cracks are filled, let the leather putty dry for 30 minutes (the drying process can be sped up slightly with a hair dryer). The filler/putty may sink slightly during the drying process, so add additional layers of leather putty until you are satisfied. Make sure it dries between each layer. Then sand the filled surface with fine sandpaper (600-1200) until it feels smooth and even.
Step 4 – Dyeing the leather
Shake the bottle of Leather Paint for a few minutes to make sure it is thoroughly mixed. The paint is quite thick, but is thixotopic and thins out when shaken. If, despite shaking, it feels too thick, you can dilute the paint with a few drops of plain water. Then pour a small amount of leather paint onto a sponge and rub the paint into the leather. Press lightly so that the leather paint penetrates the leather fibers properly. If you press too hard, a foam may form, but this is not dangerous, just make sure to carefully wipe it off before the paint dries.


The idea is that we will use the sponge to apply a first layer of leather paint in all the folds and places where it is difficult to reach with a sprayer, and by massaging the paint into the pores of the leather, create a proper bond between the leather and the paint. You can then choose whether you want to continue sponging all the layers, or if you want to spray the leather paint with a paint sprayer/airbrush. The picture above on the right shows what it looks like with a layer of leather paint sponged onto the surface. After the paint has dried, you can sponge on additional layers of leather paint. Note that it is important to “dab” the paint starting with the second layer; if you do not do this, but drag the sponge, there is a risk that the first layer will come off the surface of the leather, and the result will be like applying the first layer of paint over and over again.
If you have access to a paint sprayer, finish by spraying at least one coat of paint. Make sure the sprayer is at the right distance from the surface to be sprayed, and then spray a thin coat on small areas at a time. Dry the applied paint with a hair dryer, this is to prevent the paint from running. Practice first on a piece of paper to get the “right crease”. Should the paint still run, soak up the run with a sponge and spray on another coat. It is important to let the paint dry between each applied coat.
There is no rule for how many coats of paint to apply to a surface, dab on layer after layer until it covers properly and you are satisfied. Normally, leather paint usually covers properly after 2-3 coats.
Step 5 – Surface finish
Once you are satisfied with the amount of leather dye, it is important to let it dry thoroughly, preferably overnight. Then the dye should be sealed with a couple of coats of Leather Finish . Leather Finish, or leather finish/surface finish, works like the clear coat on a car, it protects the paint and makes the surface very durable, but at the same time soft and pleasant, the “leather feel” comes out. The lifespan of the dyeing is significantly extended. In addition, with the leather finish you choose the gloss level of the surface, whether it should be glossy or matte, or perhaps silky smooth (satin). The satin gloss is halfway between matte and glossy on the scale, and gives a good “shine” without being glossy. Most types of leather have a satin gloss when it is new, you could say that Satin Leather Finish is neutral.
The finish is applied in the same way as the paint above. It is possible to sponge on, but the easiest way to get an even layer is to spray on the leather finish. We recommend at least two coats of finish. Note , The leather finish is much thinner than the leather paint, which makes it extra important to be careful not to run. The finish also makes the paint a little lighter. Note again , if you add a little hardener Safe Link in The finish further increases durability. Recommended for particularly exposed areas, and if the leather will be exposed to "weather and wind".
Job done, the worn leather sofa is like new!

The picture above shows the sofa in its finished state. The surface of a leather sofa is often slightly shiny when new. This shine can either be enhanced by using a glossy finish, or reduced by using a matte finish. In this case, Leather Finish Satin has been used to recreate the original finish. Satin Leather Finish is neutral between matte and glossy and provides a “silky” surface. Satin is also the most common finish on leather.
To extend the life of your sofa, we recommend regular leather care. Clean and treat with protective cream at least once a year. Leather cleaner Ultra Clean and Protective cream are available in our leather care kits. Buy leather care kits in the Leather Specialist's webshop, you can find them by clicking here!